You scatter the seeds, mist the tray, set it on the windowsill—and a week later, you’re staring at a patchy, thin mat with bald spots and clumps. It’s not the seeds. Almost every sparse chia microgreens tray comes down to three setup mistakes you can fix in your very next round: uneven distribution, incorrect seeding density, and surface moisture that’s either too wet or too dry. Here’s the density adjustment that turns a disappointing windowsill experiment into a lush, even carpet of greens.
The visual diagnosis: Thin and patchy vs. full mat
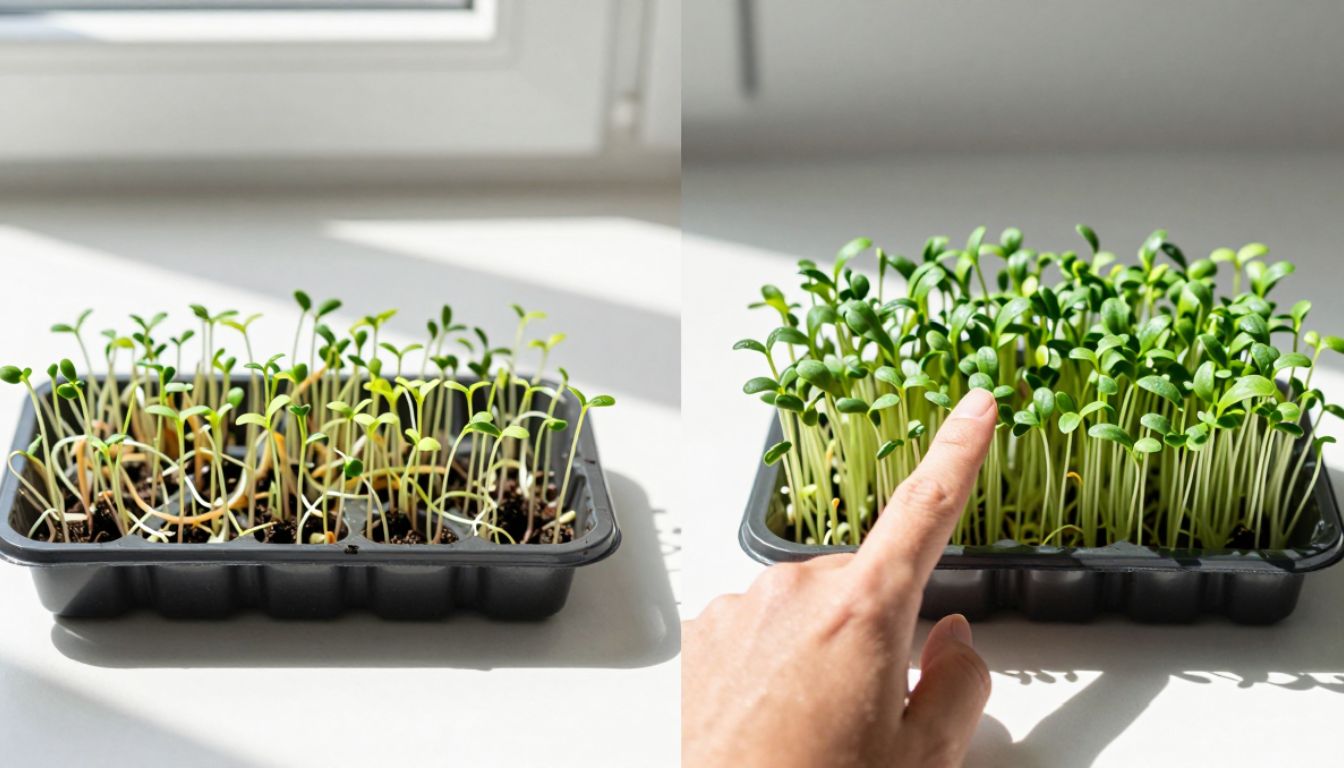
A healthy chia microgreens tray should look like a soft, uniform lawn by day four—dense enough that you can barely see the growing medium between the stems, but not so thick that seedlings are fighting for light. Sparse trays show three telltale signs: bare patches where seeds never landed, tight clumps where seeds piled up, and dry edges where moisture never reached.
Hold your tray up to the light. If you see more medium than green, or if some areas are a jungle while others are desert, you’re looking at a density problem. The good news? It’s a mechanical fix, not a seed-quality issue, and you can dial it in completely on your next tray.
Top causes of sparse germination
Uneven seeding is the number-one culprit. Chia seeds are tiny and sticky when wet, so they clump easily. If you pour them straight from the packet onto a damp surface, they’ll land in piles, leaving gaps everywhere else.
Too-wet surface at seeding time makes seeds stick and clump the instant they touch down. You end up with dense spots and bare zones, and those clumps often mold before they sprout.
Drying edges happen when your tray isn’t covered or vented properly. The perimeter dries out faster than the center, and seeds along the edge either fail to germinate or produce weak, stunted shoots.
Incorrect seeding rate goes both ways. Too few seeds and you get a sparse, uneven stand. Too many and seedlings crowd each other, stretch toward light, and topple over before harvest.
The density fix: Even scatter, correct amount, light mist
Start with a dry or barely damp medium. If you’re using coconut coir, soil, or a grow mat, water it lightly and let it settle for a few minutes so the surface isn’t glistening. You want it moist underneath but not slick on top.
Measure your seeds. For a standard 10×20-inch tray, use about 2 tablespoons of chia seeds (roughly 20–25 grams). That’s dense enough for a full mat without overcrowding. If your tray is smaller, scale down proportionally.
Distribute evenly using a tool. The simplest method: put your measured seeds into a small salt shaker, spice jar with holes, or a fine-mesh sieve. Hold it a few inches above the tray and tap or shake gently as you move across the surface in a grid pattern. This breaks up clumps and spreads seeds uniformly.
If you don’t have a shaker, pinch small amounts between your thumb and fingers and scatter them in a sweeping motion, like you’re salting a dish. Work in multiple passes—don’t try to cover the whole tray in one handful.
Settle with a light mist, not a soak. Once seeds are distributed, use a fine-mist spray bottle to dampen them gently. The goal is to anchor them in place and initiate germination, not flood the surface. Two or three passes with a mister is enough. You should see seeds darken slightly as they absorb moisture, but they shouldn’t be floating or clumping together.

Moisture rule: Damp medium, drier surface, daily venting
After seeding, cover your tray with a humidity dome, plastic wrap, or another inverted tray. This holds moisture and warmth, which chia seeds love. But don’t seal it completely—trapped condensation leads to mold and uneven germination.
Lift the cover once a day for 30 seconds to let fresh air in and excess moisture out. If you see big water droplets on the cover, wipe them off or flip the cover. The surface should stay damp to the touch, not wet or shiny.
Check the edges daily. If they’re drying out faster than the center, mist them lightly or tuck a damp paper towel along the perimeter for the first two days.
Day 2–4 checkpoints: What even germination looks like
Day 2 (48 hours): You should see most seeds swollen and beginning to crack. Tiny white root tips will be visible across the tray. If large areas show no activity, they were either too dry or didn’t get seeds in the first place.
Day 3: Root tips push into the medium, and the first pale green loops (cotyledons) start to emerge. The tray should look evenly speckled with sprouts. If you see dense clumps and bare spots, make a note for next time—it’s a distribution issue.
Day 4: Cotyledons open and turn green. The tray should resemble a low, uniform carpet. At this point, remove the cover completely and move the tray into bright indirect light (or under a grow light). The stems will strengthen and the leaves will darken over the next few days.
If your day-4 tray still looks patchy, it’s too late to fix this round, but you’ve learned exactly where the setup went wrong.

Quick reset plan for your next tray
Before you seed again, write down your seeding rate and method. If this tray was too sparse, add a half-tablespoon more seeds next time. If it was too crowded, pull back slightly.
Prep your tool. A clean salt shaker or spice jar with a perforated lid takes ten seconds to fill and makes distribution effortless. If you’re growing chia microgreens regularly, this one-time setup will save you frustration on every tray.
Adjust your misting. If seeds clumped, your surface was too wet at seeding. If edges dried out, increase humidity or mist edges separately on day one and two.
Track your results. Take a quick phone photo on day four. After three or four trays, you’ll have a visual record of what works in your specific setup—your windowsill light, your medium, your misting routine.
Optional tool tip: Salt shaker or sieve
A small salt shaker (the kind with adjustable holes) is the single best tool for seeding chia microgreens evenly. Fill it with your measured seeds, hold it six inches above the tray, and tap the side gently as you move in a slow grid. You’ll get perfect, even coverage with zero clumps.
If you don’t have a shaker, a fine-mesh sieve works just as well. Put seeds in the sieve, hold it over the tray, and tap the rim with your hand. The seeds will fall through in a light, even rain.
Both methods take less than a minute and eliminate the guesswork. Once you’ve seeded a tray this way, you won’t go back to scattering by hand.

Your next tray will be different
Sparse, patchy chia greens aren’t a seed problem or a luck problem—they’re a setup problem, and setup is completely under your control. Measure your seeds, distribute them evenly with a tool, settle them with a light mist, and keep the surface damp but not wet. Check your tray daily, vent once, and watch for even germination by day three.
Your next windowsill tray will come in thick, green, and uniform—ready to harvest in seven to ten days. And once you’ve dialed in your seeding density and method, every tray after that will look the same: lush, reliable, and exactly what you pictured when you started.