If I had to pick one thing that makes windowsill chia microgreens explode with growth, it’s not a special tray or fancy light—it’s a simple humidity-and-airflow balance you can set up in 30 seconds.
I’ve watched friends spend money on LED strips and expensive seed mats, only to see their chia greens turn slimy or shrivel up. Meanwhile, the growers who nail this one controllable lever—keeping moisture below and air moving above—harvest thick, clean mats every single time. No mystery. No luck. Just physics you can dial in before breakfast.
The 30-second setup that changes everything
Here’s the whole trick: cover your tray with a tiny gap, vent it daily, and water from below.
Day 0–2, place a clear lid or plastic wrap over your chia seeds, but leave a quarter-inch gap on one side. This traps enough humidity to wake the seeds without sealing them into a swamp. Once a day, lift the cover for 15 seconds—that’s your vent. Fresh air rushes in, stale air escapes, and you’ve just prevented 90% of mold problems.
Day 3 onward, remove the cover entirely or prop it wide open. By now, roots are anchored and the greens are reaching. Keep adding water to the tray beneath the roots—never spray the leaves. The roots pull moisture up; the leaves stay dry-ish and happy.
That’s it. Thirty seconds of setup, fifteen seconds of daily attention, and you’ve engineered the sweet spot where chia thrives.
How to know you’ve got it right
Your windowsill is dialed in when you see three signs:
- Damp surface, not wet: The top of the seed mat feels cool and slightly moist to the touch, but there are no standing droplets or puddles.
- No slime smell: Lean in close. You should smell fresh, green, almost grassy. Any sour or funky odor means too much moisture and not enough airflow.
- Roots white or cream, not brown: Lift a corner of the mat on Day 4. Healthy chia roots look pale and fibrous. Brown or translucent roots signal rot.
If you hit all three, you’re in the zone. If not, the fixes are simple—and we’ll cover them in a moment.
Plug this into your Day 0–6 flow
Let’s map the humidity-airflow rule onto the full chia microgreens timeline so you know exactly when to do what.
Day 0–1 (Germination sprint): Soak seeds for 15 minutes, drain, spread evenly on a tray. Cover with lid or wrap, leaving a small gap. Place on your windowsill. Vent once in the evening by lifting the cover for 15 seconds.
Day 2 (Roots emerge): You’ll see tiny white roots poking through. Keep the cover on with the gap. Add a tablespoon of water to the tray if the mat feels dry. Vent once.
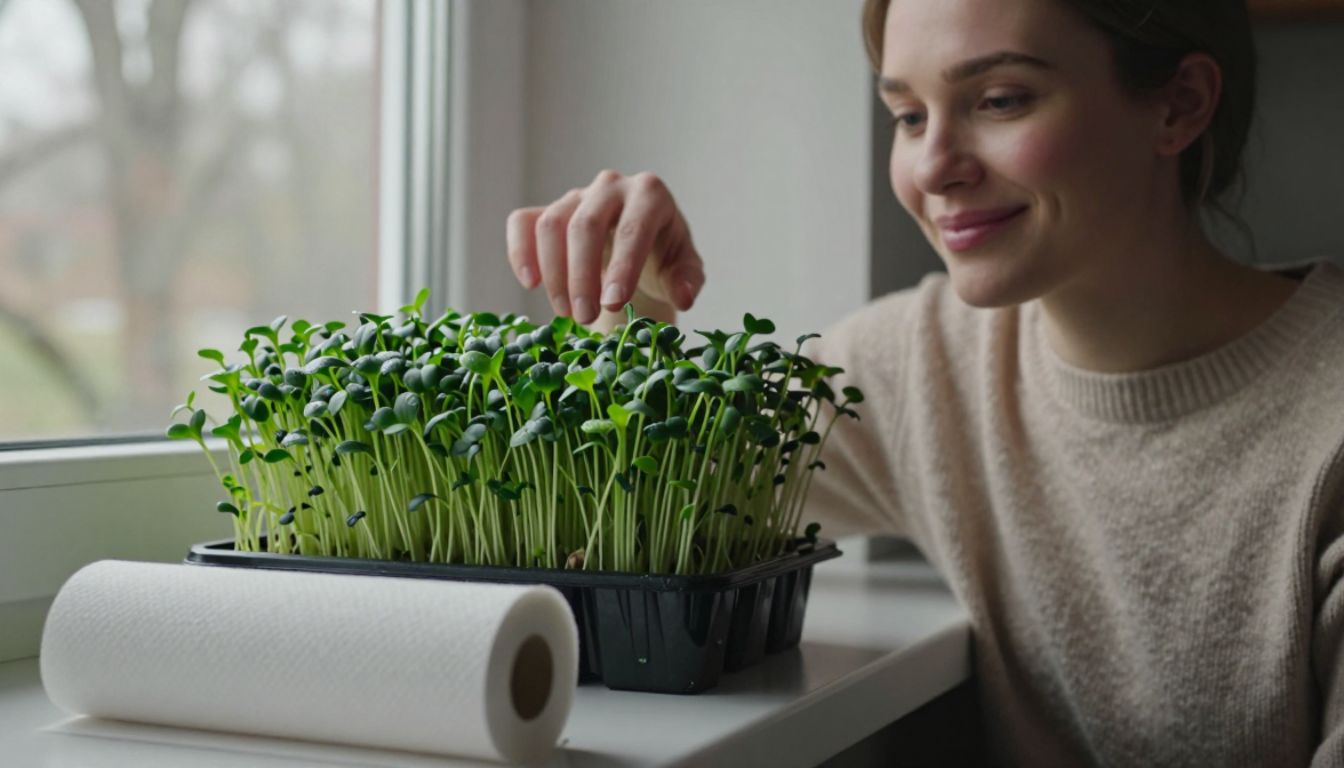
Day 3 (Green shoots appear): Remove the cover or prop it wide open. The greens need light and air now. Water from below—pour into the tray, not onto the leaves. The mat should stay damp underneath, dry-ish on top.
Day 4–6 (Growth surge): Check moisture morning and evening. Add water to the tray as needed, keeping the bottom quarter-inch wet but never flooding the roots. The greens will double in height. Harvest on Day 6 or 7 when they’re 1.5 to 2 inches tall.
This flow works because you’re controlling humidity when seeds are vulnerable, then opening airflow as greens strengthen. It’s a handoff, not a gamble.

Three failure modes and their fixes
Even with the best intentions, windowsill conditions vary. Here’s how to troubleshoot the three most common problems.
Too sealed (rot and mold): If you see white fuzz, brown patches, or a sour smell, you’ve trapped too much moisture. Fix: Remove the cover immediately. Tilt the tray to drain excess water. Move the tray closer to a window or a small fan. Vent twice a day going forward.
Too open (dry and stunted): If seeds stay hard and don’t sprout, or greens grow slowly and look pale, your windowsill is too dry or too cold. Fix: Add the cover back with a slightly larger gap. Mist the surface lightly once (just once). Check that your windowsill isn’t below 65°F—chia likes warmth.
Too wet (slime and collapse): If the mat feels slimy or roots turn translucent, you’re watering from above or flooding the tray. Fix: Stop top-watering entirely. Drain the tray and let it dry for two hours. From now on, add water only to the tray, and only when the bottom feels barely damp.
All three problems trace back to the same root cause: you lost the balance. The good news? You can reset it in minutes.
The repeatable rule you can trust
Here’s the mantra that makes this foolproof: moist below, dry-ish on top.
Chia roots want constant access to water. Chia leaves want air and light. When you water from below and vent from above, you give each part of the plant exactly what it needs. No conflict. No compromise.
This isn’t just a chia trick—it’s the logic behind almost every microgreen success story. But chia makes it especially visible because the seeds form a gel coat when wet. If that gel sits in still, humid air, it ferments. If it sits in moving, drier air, it feeds the sprout and then dries into a clean mat.
You’re not babysitting. You’re setting up a system that runs itself.

Why this one thing beats everything else
I’ve seen people obsess over seed density, light spectrum, and tray material. Those variables matter—but only after you’ve nailed humidity and airflow.
A $5 plastic takeout container with a cracked lid will outperform a $40 sprouting kit if the cheap container has better air exchange. A north-facing windowsill in January will grow thick chia greens if the moisture balance is right. The “one thing” is the highest-leverage input in the entire process.
Once you internalize this, you’ll stop second-guessing. You’ll know exactly what to adjust when growth slows or when you spot a problem. And you’ll start to see your windowsill as a little climate you control, not a lottery you hope to win.
Your next 30 seconds
If you’ve got chia seeds and a windowsill, here’s what to do right now.
Grab a shallow tray or container. Soak a tablespoon of chia seeds for 15 minutes, drain, and spread them evenly. Cover with a lid or plastic wrap, leaving a quarter-inch gap on one side. Set it on your sunniest windowsill.
Tomorrow morning, lift the cover for 15 seconds. That’s your vent. On Day 3, remove the cover and add a little water to the tray. By Day 6, you’ll have a thick mat of greens ready to snip.
One thing. Thirty seconds. A windowsill that finally works the way you hoped it would.