Most gardeners assume microgreens thrive in the heat of summer. But if you’ve ever tried growing chia microgreens in July, you’ve probably watched them wilt, mold, or bolt before harvest. Winter is actually when chia microgreens perform at their peak—and understanding why can transform your indoor gardening game year-round.
The surprising science behind winter success
Chia seeds evolved in the highlands of Central and South America, where cool nights and moderate daytime temperatures define the growing season. When you plant chia microgreens indoors during winter, you’re accidentally recreating their ideal climate.
Summer heat creates three major problems. First, temperatures above 75°F trigger premature bolting, where plants rush to flower instead of producing tender leaves. Second, warm air holds more moisture, creating the perfect breeding ground for mold and damping-off disease. Third, high temperatures accelerate respiration in seedlings, burning through energy reserves before roots establish.
Winter changes everything. Cooler ambient temperatures between 60-70°F slow growth just enough to produce thicker, crunchier leaves with concentrated flavor. Lower humidity reduces fungal pressure. And your heating system creates gentle air circulation that strengthens stems without drying out soil.
Temperature sweet spots that matter
The magic window for chia microgreens sits between 60-72°F. In winter, most homes naturally hover in this range, especially near windows where you’re likely growing your trays.
Summer indoor temperatures often spike to 76-82°F, even with air conditioning. That 6-10 degree difference dramatically impacts germination rates and harvest quality. Studies on microgreen production show that chia germination drops from 90% at 68°F to just 65% at 78°F.
Here’s what happens at different temperature ranges:
- Below 55°F: Germination slows to a crawl, taking 5-7 days instead of 2-3
- 55-60°F: Slow but steady growth, excellent flavor concentration
- 60-70°F: The goldilocks zone—fast germination, robust growth, minimal disease
- 70-75°F: Acceptable but watch for early bolting
- Above 75°F: High failure rates, mold issues, bitter taste
Your winter home naturally provides the middle ranges without any special equipment.
Humidity control becomes effortless
Summer humidity is chia microgreens’ silent killer. When relative humidity climbs above 70%, fungal spores activate within hours of germination. You’ll see white fuzz at the soil line, followed by collapsed seedlings.
Winter air is naturally drier, especially in heated homes. Most winter indoor environments sit between 35-50% relative humidity—low enough to prevent mold but high enough to support germination. You can skip the elaborate ventilation setups that summer growers need.
The mucilaginous coating on chia seeds (that gel-like substance when wet) makes them especially vulnerable to excess moisture. In summer, that coating stays wet too long. In winter, it dries between waterings, preventing the bacterial bloom that causes damping-off.
Light quality shifts in your favor
Winter sunlight enters at a lower angle, penetrating deeper into rooms. If you’re growing near a south-facing window, your microgreens receive more consistent, diffused light throughout the day.
Summer’s intense, direct rays can actually stress young seedlings, causing leaf burn and uneven growth. The gentler winter sun provides 4-6 hours of indirect bright light—exactly what chia microgreens prefer during their 7-10 day growing cycle.
If you’re using grow lights, winter gives you another advantage: cooler ambient temperatures mean your LED or fluorescent bulbs don’t add excess heat to the growing environment. Summer growers often struggle with lights that push tray temperatures into the danger zone.
How to recreate winter conditions year-round
Once you understand why winter works, you can engineer these conditions in any season.
Temperature management: Place growing trays in the coolest room of your home, away from heat vents. A basement or north-facing room works well. If summer temperatures climb too high, grow near an air conditioning vent or use a small fan to increase evaporative cooling.
Humidity control: Invest in a simple hygrometer to monitor moisture levels. In summer, run a dehumidifier in your growing space or improve air circulation with a small oscillating fan. Keep it on low speed, positioned to move air across the top of trays without directly blasting seedlings.
Watering strategy: Bottom-water your trays to keep the mucilaginous seed coating from staying saturated. Pour water into the drainage tray and let the growing medium wick it up. This technique mimics the drier air conditions of winter.
Light positioning: In summer, move trays back from windows by 2-3 feet to avoid direct sun. Use sheer curtains to diffuse intense rays. Grow lights should be positioned 6-8 inches above trays and run for 12-14 hours, preferably during cooler evening and morning hours.
Timing your grows: If you’re in a hot climate without climate control, focus your chia microgreen production on October through April. Grow heat-tolerant varieties like sunflower or pea shoots during summer months instead.

The flavor difference you can taste
Cooler growing temperatures don’t just improve plant health—they dramatically enhance flavor. Chia microgreens grown at 65°F develop 30-40% more oils and aromatic compounds than those grown at 78°F.
You’ll notice the difference immediately. Winter-grown chia shoots taste nutty and slightly peppery with a satisfying crunch. Summer-grown shoots often taste grassy, bitter, or bland because heat stress triggers the plant to produce defensive compounds instead of the complex flavors you want.
The texture changes too. Cooler temperatures produce thicker cell walls, giving you that crisp snap when you bite into a stem. Hot-weather microgreens grow thin, leggy stems that feel limp even at harvest.
Your winter growing checklist
Ready to take advantage of the season? Here’s your step-by-step approach:
- Soak seeds: Place chia seeds in cool water for 30 minutes (not longer—they’ll get too slimy)
- Prepare trays: Use a shallow tray with drainage holes and 1-2 inches of seed-starting mix
- Spread seeds: Distribute evenly, aiming for dense coverage without overlap
- Cover initially: Place a humidity dome or second tray on top for 24-48 hours
- Monitor temperature: Keep growing area between 60-70°F
- Bottom-water: Add water to drainage tray when soil surface feels dry
- Provide light: Once sprouts emerge (day 2-3), give 12-14 hours of bright indirect light
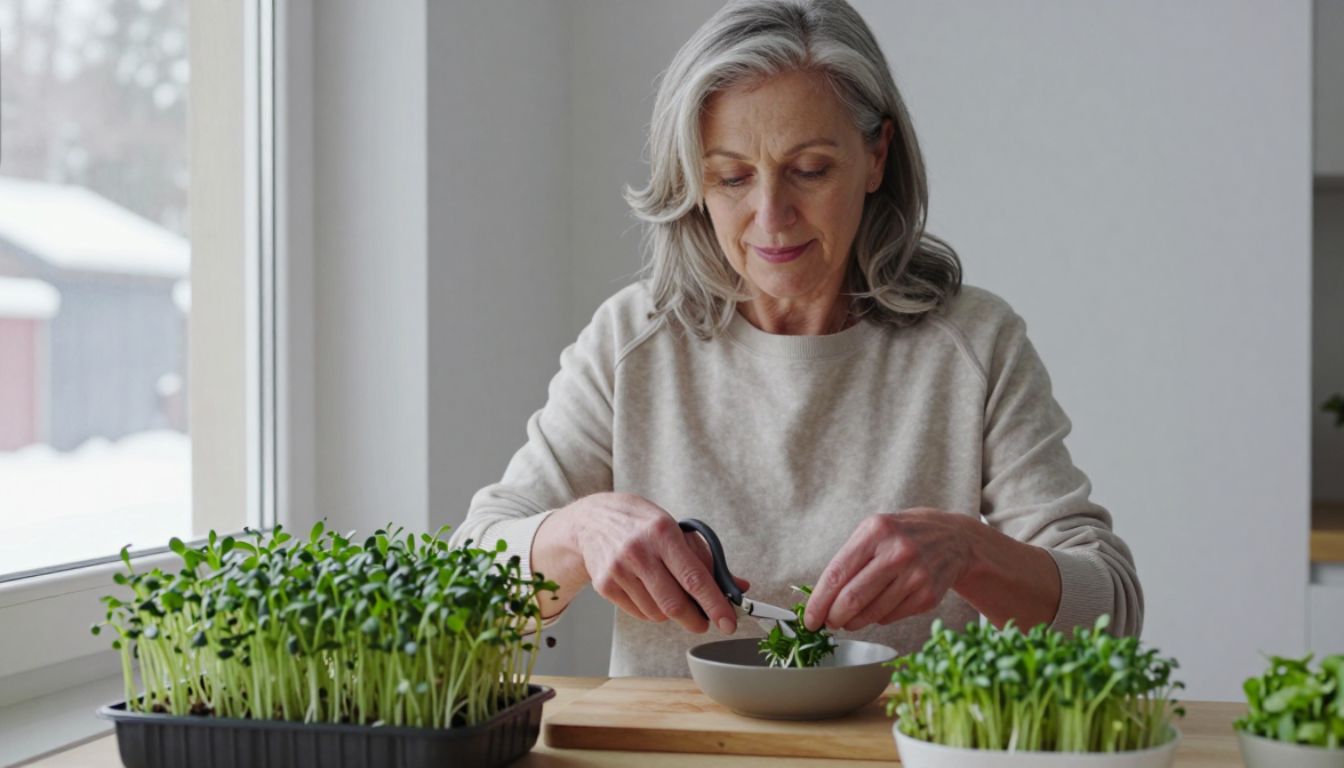
- Harvest: Cut at soil level when first true leaves appear, usually day 7-10
The process takes less than 10 minutes of active work per tray, and winter conditions do most of the heavy lifting.
Beyond chia: other winter microgreen winners
If you’re enjoying winter growing success with chia, try these other cool-season microgreens:
- Arugula: Develops its signature peppery bite only in cooler temperatures
- Mustard: Too spicy and tough in summer heat, perfect in winter
- Broccoli: Germination rates jump 20% when grown below 70°F
- Kale: Sweeter and more tender in cool conditions
- Radish: Grows faster in winter without becoming woody
You can run multiple varieties in rotation, harvesting fresh microgreens every week throughout the cold months.
Start your winter growing advantage today
You don’t need expensive equipment or complicated systems. Winter’s natural climate control gives you everything chia microgreens need to thrive. Set up your first tray this week, and you’ll be harvesting nutrient-dense greens before the calendar flips to February.
The seasonal advantage won’t last forever. As spring temperatures climb, you’ll need to implement the climate-control strategies that winter provides for free. But for the next three months, you have the perfect window to master microgreen growing with nature on your side.
Grab a packet of chia seeds, a growing tray, and some seed-starting mix. Your winter garden is waiting.