Most kids abandon their first gardening project within 48 hours. Not because they lack interest, but because they’re staring at a pot of soil that looks exactly the same as it did yesterday. No sprout. No progress. No reason to care.
That’s the invisible dealbreaker parents miss when they buy a gardening kit: children need visible wins, fast. If the first seed takes two weeks to germinate, you’ve already lost them to screen time.
The good news? With the right kit and a cleverly chosen first project, you can deliver that “wow” moment in under five days—and turn gardening into the one activity your child actually asks to do again.
The #1 reason kids quit gardening (and how to fix it)
Adults can wait. Kids can’t.
When a child plants a tomato seed and nothing happens for ten days, they don’t think “patience is a virtue.” They think “this is boring” and move on. The problem isn’t the child—it’s the seed choice.
Fast-sprouting seeds are non-negotiable for beginners. Radishes, cress, and mung beans germinate in 2–5 days. That’s fast enough to hold attention. Slow growers like carrots or peppers? Save those for project three, after they’re hooked.
The second silent killer is tools that don’t work. Plastic trowels that bend. Gloves that slide off small hands. A watering can with a spout so wide it floods the pot. Kids interpret these failures as their own incompetence, and they quit.

What to look for in a gardening kit that actually works
Not all kits are created equal. Here’s what separates a drawer-dweller from a kit that gets used every weekend.
Real tools, scaled down. Look for metal trowels and forks with wooden handles, not flimsy plastic. They should feel like “real” versions of adult tools, just smaller. Kids know the difference, and it matters to their sense of ownership.
Gloves that fit. Most kits include one-size-fits-all gloves that are too big for a six-year-old and too small for a ten-year-old. Check the sizing. Gloves with wrist elastic stay on better.
Seed variety that includes fast growers. The kit should offer at least one option that sprouts in under a week. Bonus points if it includes a mix: one fast (radish), one medium (sunflower), one edible (basil).
Mini pots or biodegradable starters. Small containers (8–10 cm) are easier for kids to manage. Biodegradable pots let them transplant without disturbing roots—less mess, higher success rate.
A simple visual guide. Not a 20-page manual. A single laminated card with pictures showing seed depth, watering frequency, and days to sprout. Kids should be able to follow it without asking you every step.
In India, brands like Ugaoo and AllThatGrows offer beginner-friendly kits with good tool quality. International options like Green Toys and Melissa & Doug are widely available online but check that seed types suit the local climate.
The 5-minute “first win” project that hooks them
Here’s the project that works every time, regardless of age or experience.
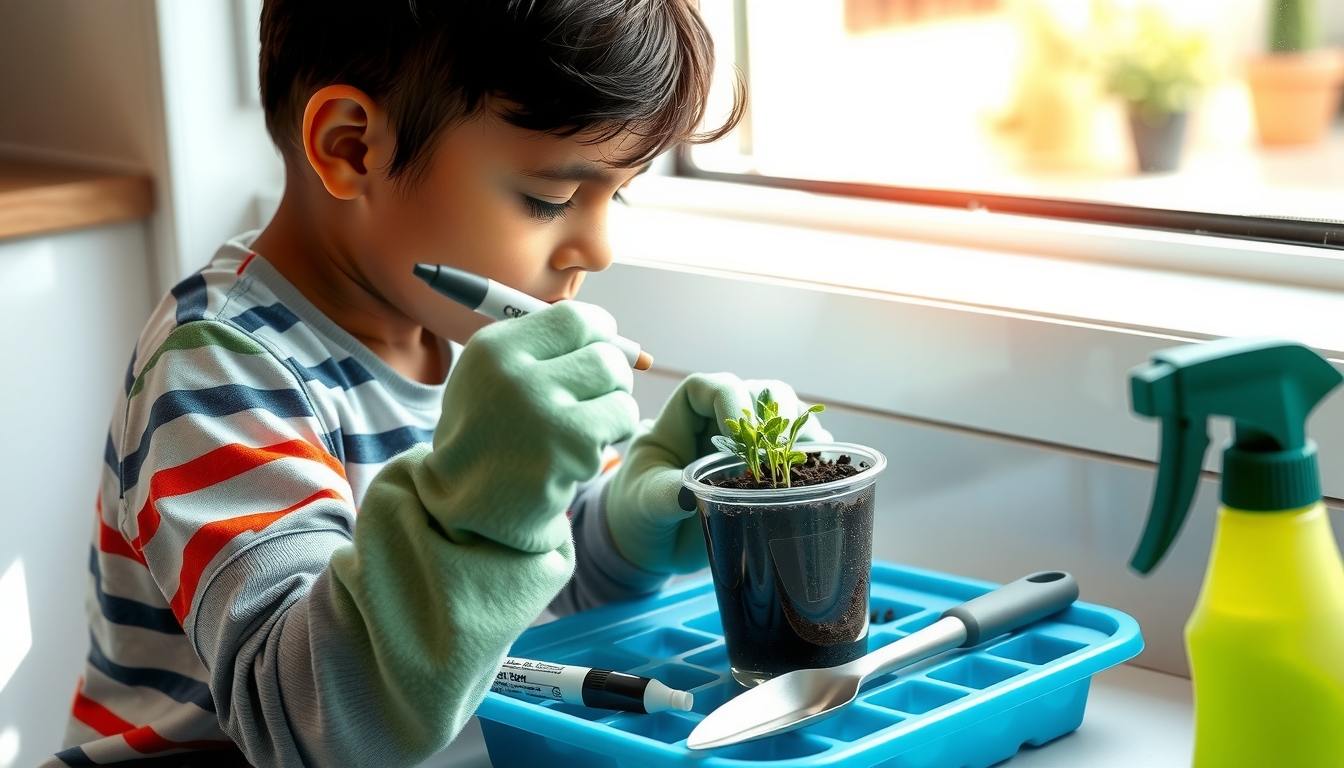
What you need:
– Cress or mung bean seeds (both sprout in 2–3 days)
– Clear plastic cups (so kids can see roots forming)
– Potting mix or even damp cotton wool
– Permanent marker for labeling
The process:
1. Fill each cup halfway with soil or place a layer of damp cotton wool at the bottom.
2. Let your child sprinkle 5–6 seeds on top. No need to bury them deep—cress germinates on the surface.
3. Mist lightly with water (a spray bottle works better than a can for small hands).
4. Label the cup with the child’s name and today’s date using the marker.
5. Place on a sunny windowsill.
Why this works: By day two, they’ll see the seeds swell. By day three, tiny green shoots appear. By day five, they can snip and eat cress on a sandwich. That’s three moments of visible progress in under a week—enough to build the habit.
The clear cup is the secret weapon. Kids can watch roots grow downward, which feels like a science experiment, not a chore.

Safety and mess-proof tips parents actually need
Gardening with kids doesn’t have to mean soil all over the kitchen floor.
Use a tray. A large plastic tray (like a cafeteria tray or a shallow storage bin) contains spills. Everything stays on the tray: pots, tools, soil bag. When you’re done, carry the whole tray outside to shake it out.
Pre-portion the soil. Don’t hand a child a 5 kg bag of potting mix. Scoop what you need into a smaller container or ziplock bag. Less weight, less mess, more control.
Teach the “tap and brush” rule. After handling soil, tap hands together over the tray, then brush off on the edge before touching anything else. It’s a simple ritual that cuts cleanup time in half.
Safety checklist:
– No sharp pruning shears for under-eights; use child-safe scissors for harvesting.
– Supervise watering near electrical outlets.
– Check that seeds and plants are non-toxic (avoid anything in the nightshade family for very young kids who might taste-test).
– Sunscreen if you’re working outdoors, even in December in India—UV is still strong.
Next 3 projects by age group
Once the first project succeeds, here’s how to keep momentum.
Ages 4–6:
– Sunflowers in a pot. Big seeds, easy to handle. Germination in 7–10 days. Kids love measuring the stalk as it grows.
– Herb garden in a windowsill box. Basil and mint are forgiving. They can pick leaves for family meals—instant pride.
Ages 7–9:
– Cherry tomatoes. Longer timeline (60–80 days to fruit), but the payoff is huge. Use a support stick so they learn about plant structure.
– Butterfly-friendly flowers. Zinnias or marigolds. Attracts insects, which adds a wildlife observation layer.
Ages 10+:
– Vegetable patch planning. Let them design a small bed layout on paper first. Introduce crop rotation concepts.
– Composting project. Set up a small compost bin. They track what breaks down and what doesn’t—great for science class tie-ins.
Rotate projects by season. In India, December 2025 is perfect for cool-season crops like radishes, peas, and leafy greens. Avoid starting heat-lovers like peppers or okra until February.

Your downloadable checklist and shopping list
To make this even easier, here’s what to grab before you start.
Shopping list (India-friendly):
– 1 beginner gardening kit (₹500–₹1,200) or assemble your own:
– Small metal trowel and fork (₹150–₹300)
– Kids’ gardening gloves, sized (₹100–₹200)
– Watering can or spray bottle (₹80–₹150)
– Seed packets: cress, radish, sunflower, basil (₹20–₹40 each)
– Potting mix, 2 kg bag (₹60–₹100)
– 4–6 small pots or clear plastic cups (₹50–₹100)
– Permanent marker
– Plastic tray for containment (₹100–₹200)
First-week checklist:
– [ ] Set up the tray in a stable, sunny spot
– [ ] Complete the 5-minute cress project together
– [ ] Check and mist seeds every morning (make it part of breakfast routine)
– [ ] Celebrate the first sprout with a photo
– [ ] Plan project two based on your child’s age group
The goal isn’t to raise a master gardener by next month. It’s to create one small, repeatable success that doesn’t require you to nag. When kids see something grow because of their actions, they internalize a powerful idea: effort creates results.
And unlike most toys, a gardening habit compounds. The radish they plant in December becomes the tomato plant they nurture in March, which becomes the vegetable patch they plan in June. All because you chose a seed that sprouted fast enough to matter.
Start with the cress project this weekend. Five minutes, one clear cup, and a windowsill. That’s all you need to find out if this is the activity that finally sticks.